12 Years a Bug Friday, January 12, 2018
Shipping software sucks.
It's not that we don't want to put the software in the hands of our users. And it's not that we're not proud of the work. We do, and we are.
What sucks is that you always ship with bugs. Always. Some of them you know about. Some of them you don't.
Anyone who does this for a living knows how this works. You keep track of everything you find in the software. Some things are reproducible. Some things aren't. You draw up general approaches for investigation for the latter, and propose fixes for the former.
You then prioritize things, hash out a schedule, and decide what's worth fixing and what you can, in the end, live with...for now.
"We need to fix this post 2.0"
During the run-up to SuperDuper v3.1.2 (available today, see below), we were dealing with this whole investigate-prioritize-allocate-test cycle, when someone brought a sheet to our attention that's been a known low-priority thing for years.
12 years, to be precise.
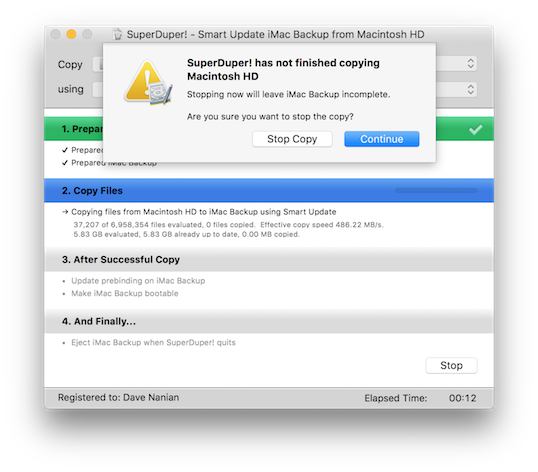
It's the basic "Stop the copy in progress" sheet that comes up when you want to stop a copy. It's something you can do by accident, and throw away a lot of progress, so we show a sheet that asks you whether you really want to stop.
Sensible, as far as it goes. But during the development of 2.0, there were a lot of potential cases that would have to be dealt with during a cancel, and while we were working through them, and how to present them to the user, a temporary cancel sheet was put in place.
A sheet that was immediately logged as "this has to be fixed" in our tracking database, because it was poorly worded, confusing and (please don't hurt us) had "Yes/No" buttons at the bottom. Enjoy this example of our overwhelming UI genius:
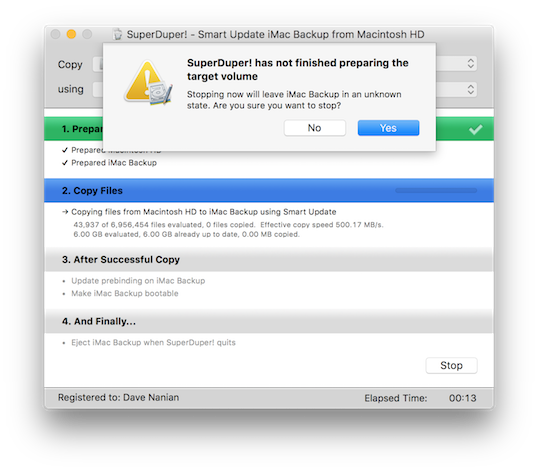
So many problems with that sheet. It's wrong, it uses crazy terminology, it doesn't match the rest of the app, it uses Yes/No buttons. I don't even...
There was a lot to do for v2.0, and development proceeded, other tasks took precedence, this sheet isn't used very much, and eventually we shipped 2.0 with the sheet in place, with the bug tagged as low-priority, known-terrible, embarrassingly bad, "we need to fix this post 2.0".
That cycle repeated over and over. It was an easy fix, but other things took precedence. This stuff happens. Shipping software sucks.
Well, it was terrible, and it's now 12 years post 2.0. So for the new year? Start celebrating, because it was fixed.
More Fixes!
This version also fixes a bunch of other relatively minor things that should please one or more of you:
- On some systems, the default settings didn't save if you had available snapshots and then went into Options, changed something, and exited.
- If your drive had a "#" in its name, an erase-then-copy backup would generate an error.
- Renaming a drive wasn't always reflected properly in the UI.
- Sometimes the Stop button would beep and not stop
- In some regions, snapshot date parsing could cause a crash at startup or drive selection
General cleanup, nothing too exciting, but a fix is a fix, and now they're available to you. Download away!
Download SuperDuper! v3.1.2
Snapshot Surprise! Friday, December 08, 2017
We've got something under the tree for all of you, and you get to open your present early.
Executive Summary
SuperDuper! 3.1 is out, and now allows Time Machine-like restoration from bootable APFS copies.
Wait, What?!?!
Oh, decided to join us for the details? Welcome to an ocean of words: prepare to get your feet wet!
Well, I told you there would be more surprises in store, and, so, here we are. Since the release of 3.0, we've not only been copying from a snapshot when using an APFS source. In addition, as some of you have noticed, we've also been creating snapshots on the backup.
This is why.
Turn Back the Clock
In SuperDuper! v3.1, you may notice a small change to the Copy Now button: a little up-triangle glyph. If you've selected an APFS volume as your source, you can click that triangle, and up pops a list of the snapshots available to copy from.
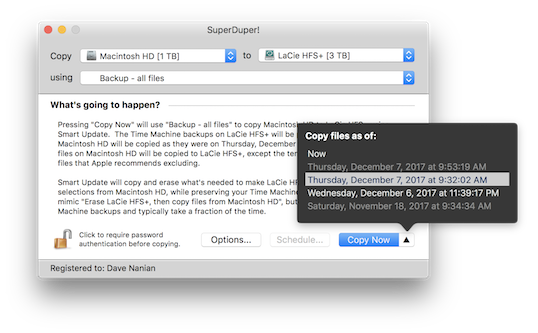
This means you don't just have to copy from the drive as it is "now" (the default choice). You can select from any existing snapshot, and we'll copy the state of the files as they were at that time.
But why would you want to do that?
Well, in High Sierra, the system takes a snapshot of your drive before it installs a software update. Having a problem with an update and want to check if it was different before, but forgot to back up first? No problem: use SuperDuper! to copy from the snapshot taken just before the update was installed, start up from the copy, and check the behavior.
Even better, if you're backing up to an APFS volume as we encourage, this works on a bootable copy, too! Since v3.0, we've been taking a snapshot of the backup volume before every copy we make. That means there's not just one available backup on the drive—if you've been using Smart Update, there are many! Start up from your backup drive, click the triangle, and you'll be presented with a list of available snapshots. Pick one, "Copy Now", and you've restored a day ago's backup, or a week ago's.
But Wait—There's More!
In fact, not only can you use SuperDuper to copy from these snapshots, you can even open Time Machine, select your backup volume, and see older versions of files, deleted files - they're all being saved, automatically, every time you Smart Update. Even though you're not backing up your backup to Time Machine. Because that would be silly.
This new feature is not intended to replace or replicate what Time Machine does. Snapshots are managed by the system, and at present they have some lightly-to-not documented constraints. You need to have about 20% free in a container to create a snapshot, and the system consolidates and removes snapshots according to its own logic.
As I've said before, an effective backup strategy should have multiple parts: SuperDuper!, Time Machine and an online service. The more (and more varied) backups you have, the safer you are. This new feature gives SuperDuper!'s bootable backups some cool new capabilities and an additional measure of protection should you make a mistake.
Now How Much Would You Pay?
Pretty awesome, right?
Needless to say, this is the kind of feature we love to introduce. It's completely transparent to the user, and is built on the extensive work we did to support APFS in v3.0. That support wasn't done at a surface level: we worked hard to research and make use of the more advanced features, like snapshots, and planned for the future in ways that truly make the backup experience better for everyone.
Including you. Update away!
Download SuperDuper! v3.1
It’s Not a Turkey Monday, November 20, 2017
One of the weird parts of doing a public beta, as we did for 3.0, is that the release of the final version doesn't quite feel the same. So, even though it's only been two weeks since 3.0 came out...it feels like it was released months ago.
The 3.0 release has actually gone incredibly smoothly. The extended beta managed to attract a large number of diverse system configurations, and that helped us ensure that any post-release issues would be...obscure. And, indeed, they have been!
Pulling the Right Levers
A program like SuperDuper! needs to make choices about how to interface with the system. There are many different layers, and we try to choose appropriately, depending on what we're doing.
To ensure a maximum level of compatibility, it's incredibly important to work at as high a level as possible for any given activity. For example, when SuperDuper! needs to erase a drive, it would be a huge mistake to actually jump down to the driver level and start mucking with drive structures.
Instead, we do the sensible thing: we ask Disk Utility to do it for us.
Talk to the Command
Disk Utility, though, is what's called a command-line tool: you can run it yourself, from the Terminal application, if you want to: type diskutil to see what it does, and man diskutil for its documentation. Much of macOS is built upon these Unix tools, and (where appropriate), so is some of SuperDuper.
When you talk to a tool like this, though, you have to both check its "return value" (basically, a rough "I worked!" or "I failed!"), and its text output (which says why it worked or failed, or gives you an answer to a question you asked).
Some of these tools (diskutil, hdiutil, etc) will format their output in plist format: basically, a structured XML document that's far more predictable, easier to parse, and more reliable. So rather than returning "Drive formatted as HFS+", it might return (intentionally simplified)
<format>hfs+</format>
which is obviously less friendly to people, but a lot better for programs trying to figure out what's going on.
This plist output's advantage is that its structure is strictly defined. It has a prologue, a series of tags and values, and an end. This is all guaranteed.
Samsung!
So, when a few users started getting some crazy, inexplicable errors (typically, an error indicating that a volume that was there couldn't be accessed), we were shocked to find, after doing some extensive investigation, that a Samsung SMART driver (based on an open source project) was actually polluting diskutil's output with a bunch of debugging/progress junk.
Needless to say, this prevented parsing of the output, and resulted in a stream of invective that did not diminish for many minutes. So frustrating. But fixed.
Various Improvements
That was the big one. But we also fixed a number of other things:
Finally fixed the update animation bug! So, if you install 3.0.1, the next release is going to show up properly in all cases. This time for sure!
This took such a long time to fix because it was entirely timing related and didn't happen in the debugger. But, we figured it out. So embarrassing. Gonna miss you, you little rascal. (Please don't darken our UI door ever again.)
- Settings conversion related quit issues
- More reliable sleep prevention during a copy
- Supports encrypted destination volumes on 10.12
- Restored 10.9 support
I also took some time over the past week to turn on SSL for Shirt Pocket, so site access and downloads are all being done securely.
Happy Thanksgiving
So, with that, from our families to yours, have a Happy Thanksgiving, and enjoy SuperDuper! 3.0.1, which is available via the built-in updater, from the web site, or here:
SuperDuper! 3.0.1 Download
Bad Craziness, Good Release! Wednesday, November 08, 2017
The short version
Blah-blah-blah what-the-heck-are-you-talking-about-Dave so many words oh, 3.0 is released? Got it.
The wordy-but-interesting version
Sometimes, on macOS, you run into behavior that really makes you go "huh".
An example: as you likely know, you can create a disk image with Disk Utility and format it as APFS. Which works fine.
And, if you've been reading the blog, you probably also know that APFS volumes reside in a container, which itself resides on a GUID partitioned drive. So, multiple layers: drive, partition, container, volume. You can see all those in Disk Utility.
But once you create the image, what you see in Finder is simpler: a single ejectable volume, with the name you gave it. So, you can open it, copy to it, eject it, and there you go.
Great, right?
Not so much
Ah, but programmatically, things are different.
If an application opens an image the old way, and then unmounts its volume using diskutil, umount or hdiutil, it doesn't do what it used to do.
You can easily see this in Disk Utility, too. After you create the image, try selecting the volume and clicking the eject button. When you do that, you'll see that while the volume ejected, the image is still sticking around in the sidebar. And if the image is hosted on an ejectable drive or network volume, and you then try to eject the host volume, you'll find the it can't be ejected.
Worse, if you force eject the host at this point (hey, folks—don't force eject!), you can damage the image.
Not good.
Huh.
Worlds within worlds
So, what's going on is that there are still two things "attached" from the image: the container and the partition. They don't get "released" after all the volumes are ejected for some inexplicable reason. And so, any application that mounted and ejected images can no longer rely on the previous behavior.
Mischief, managed
Fortunately, this is another situation that SuperDuper! handles for you. If you back up to an image file, you don't need to know what I've just explained: we deal with the details, and eject all the "parts" of an APFS image without any manual intervention.
As you've heard many times from me: it just works.
So while you may not want to know why, or how all this is accomplished...isn't it comforting to know that someone's figured it out and has your back?
#Finally
With that last bit of explanation, I'm happy to say that we've reached the end of this particular voyage. SuperDuper! 3.0 (release 100!) is done, and you'll find the download in the normal places, as well as in the built-in updater, for both Beta and Regular users.
SuperDuper! 3.0 has, literally, many hundreds of changes under the hood to support APFS, High Sierra and all versions of macOS from 10.9 to the present.
SuperDuper! 3.0 is the first bootable backup application to support snapshot copying on APFS, which provides an incredible extra level of safety, security and accuracy when backing up. It's super cool, entirely supported (after all, it's what Time Machine uses...and it was first overall), and totally transparent to the user.
It doesn't stop there, of course. We're already in progress on the next version, and we've got some really great things planned.
Thanks to all of you who participated in the beta, because the final release couldn't have happened without you.
And to those of you who didn't participate in the Beta: you are going to love the final result.
Without further ado, download SuperDuper! 3.0
Enjoy!
The Beta 7 Spooktacular! Wednesday, November 01, 2017
Gee, do you think the original plan was to release this update on Halloween? Spoooooky!
Poof!
When “Erase, then copy” is selected, SuperDuper! has always endeavored to match the format of the source. That is, if the source is Mac OS Extended [HFS+] (Journaled), and the destination is Mac OS Extended (Case Sensitive), on an erase, the destination would end up matching the source, adding Journaling and removing Case Sensitivity.
As I mentioned in one of my first High Sierra posts, we always knew this wouldn’t work when going HFS+ to APFS: you just can’t format an APFS container as HFS+ safely, since it can affect more than just the one volume.
We’ve discovered during our broader Beta rollout that, due to weird bugs in Disk Utility, formatting an HFS+ drive as APFS is unreliable too. Sometimes the drive just “vanishes” and doesn’t re-mount. Sometimes it fails for no reason. Sometimes it makes the one volume unreadable until it’s erased again.
It’s kind of scary crazy. But that seems to be par for the early version High Sierra course. It’s relatively solid in the main, but really weak at the margins.
...But I Don’t Do That
So, we’ve made a change in our “magic” behavior to deal with these issues. Basically, we continue to do what we’ve always done. But if the “major” part of the file system doesn’t match (that is, HFS+ and APFS), we just maintain the existing format of the drive.
So, if you copy APFS to an HFS+ volume with erase, we’ll erase the destination but leave it as HFS+.
Hopefully we’ll be able to change this as macOS stabilizes further.
Enter the Void
I regret to say that we’ve fixed the “black flash” bug, so you’ll no longer have a moment to stare into the blackness as it stares back at you.
Perhaps that’s for the best.
Spaced
We didn't notice (but should have) that our various numbers were now proportionally spaced rather than monospaced since we built against a newer SDK with different targeting when we made the UI 64-bit.
Of course, someone—and you know who you are—noticed right away. Embarrassing, and fixed.
It’s Log, It’s Log!
One of the things we’ve done is improve our diagnostic logging, so when people send in a bug report, we get a better feeling for the state of the drives attached to the system, and the problems that might be going on with the system, should there be any.
We changed this a bit to only collect the extended log information when copies fail.
In earlier OS versions we would include a bit of the system log, so we could see what hardware was doing at the time of the copy. That stopped working in recent macOS release, so we've changed it to use log show.
The problem is, log show -last 1m, including a kernel predicate so it only returns low-level kernel logging, can be slow. Not only that, but due to bugs in the logging subsystem, it can incorrectly return much more than one minute of logging. We've seen it return almost a gigabyte of log data!
Even though we also limit the data to a short snippet at the end of all that text, we have to wait for it to be collected, and when the system grabs too much, it can take a while to retrieve and then discard the extra stuff.
The end result of all this is that we only do it when copies fail, and we put up a modal sheet while it's going on.
And Also, Too
Previously, when users sent in a report, we only included the log information when they reported an "Error during copy". We were a bit too clever for our own good there, since people didn’t always choose the right issue type, and then we’d have to ask for the report to be sent in again. We now always attach the log when using “Send to Shirt Pocket”.
These are small things, I know, but they'll help me help you more quickly and efficiently, should you ever need support.
I Can't Quit You, Baby
There are still some issues with quit that we're aware of...we're working on them.
Various and Sundry
There has also been a bunch of polishing and fixing things at the margins, thanks to user reports from highly unusual configurations, but as before, things are working really well on the vast majority of systems, which we’re really happy about. It’s just kind of boring to write about how great things are working for most people!
So you get the point. And now you get the results. Download away!
Download SuperDuper! 3.0 B7
Workaround Turtle Wednesday, October 25, 2017
Any program of sufficient complexity ends up having to work around behaviors that are undesirable. That might be a usability issue caused by default framework behavior, due to the interaction model selected by the designer. Or it might be an OS issue that only shows up in some situations (the recent iOS calculator bug is a good example of that).
Most, though, don't have to deal with the huge variation of hardware, software, OS, etc that a program like SuperDuper! has to handle.
The vast majority of the beta cycle has been focused on getting coverage of as many systems as possible. With a broad range of different setups and configurations, we can then find issues in the way macOS 10.13 is dealing with those configurations, and try come up with workarounds so, when when we release the GA version of SuperDuper! 3.0, the broader user community will have a smooth experience.
A lot of these changes have been focused on attached volumes, incorrect state information being returned by macOS calls or tools in some configurations and states, and coming up with ways to prod and probe until macOS returns the correct data.
It can be challenging to do, since you don't want to break "working" setups, and any workarounds should only come into effect in situations where they're needed. That way, when the OS problems are fixed, everything continues to operate.
All of that is a longwinded way of saying, we're happy to release Beta 6 of SuperDuper! 3.0, which has even more workarounds for macOS issues, covering a broad variety of situations we've seen in the past week or so. (It's workarounds all the way down!)
The new beta should work better on every system, and it fixes a problem with the beta autoupdate mechanism as well...so the next release's autoupdate should work better.
Download away, and thanks!
Click to download SuperDuper! 3.0 B6
Fraternal Twins Monday, October 23, 2017
(I really wanted to embed the teaser trailer for Peter Greenaway's A Zed and Two Noughts above, but alas it's a tad NSFW. Really great movie, though.)
Content warning: some strong language is used in this post. Not without reason.
So, here's something that you might not expect me to say:
Because of the way APFS "file clones" work, no program operating at the file level, including SuperDuper!, can make an exact physical copy of every possible APFS volume.
That's right. There are cases where we can't make an exact copy of your APFS volume. And Time Machine can't either. Nothing can.
That doesn't mean the copy is bad! It just means it might not be as space efficient as the original.
Doomed! Doomed! (Well, maybe not so doomed.)
Remember back in this post where I talked about the demo where Craig showed how fast it was to copy a gigantic amount of data?
I explained back then it was because the files aren't being copied. Rather, APFS creates new directory entries for the files, but references the same data blocks. So nothing is copied, which is fast. This is documented in Apple's APFS Guide.
From the user's perspective, these are different files. They're not like hard linked files, where changing one copy changes the others (not that most users know what hard links are). As far as users are concerned, they're totally separate, even if, at the file system level, they share the same data.
In APFS, if one of the cloned files is changed, even by a single byte, that changed data 'splits off' from the rest, and the files are now physically, and not just logically, separate—some of the data blocks now have two copies: the original ones, and the modified ones.
This process continues as the files diverge further.
The amount of logical drive space taken by the copies is twice the original, of course. However, the amount of actual space taken is, effectively zero...until the files are changed. At which point the space taken is the original plus the number of modified blocks.
This is all handled for you by APFS. You don't really have to think about it.
Quantum Theory?
Until you do have to think about it.
Consider this case: you have a 1TB APFS drive, and three 333GB files, named A, B, and C. So the drive is nearly full.
You then create a folder, and copy the three files into that folder with Finder. Of course, you'd expect the copy to fail and the drive to fill...but it doesn't.
In fact, if you look at the volume's size with Get Info, you may be surprised to see it has the same amount of data on it as was there before you made the copies. But, if you look at Finder's size for the folder, you'll see you now have 2TB of data on a 1TB drive. It's like magic!
At least until you change one of the files.
But now, select those files and folders with Finder and try to copy them to another 1TB drive. What happens?
The drive fills.
A Shitty Analogy
You can't copy it to the same size drive! But why?
The reason is there's no (public) way to find out that two files are actually sharing the same data (they might even only be sharing some of the same data, as I explain above). So, when copied, the "clone" relationship is broken, as is the ten-pounds-of-shit-in-a-five-pound-bag magic. You now have a full ten pounds. It doesn't fit...so you end up covered in shit.
But What If You...
Yes, we know:
What if you kept track of checksums of every file on the drive, and then made "clones" for each file based on whether the files had the same data?
Leaving aside how ungodly slow that would be (think about trying to match ten million files to each other via checksums every time you copied), remember that cloning operates at a block level, where some blocks may be shared and some may not be. At a file level, it just won't work.
How about using hard links?
That won't work either: clones and hard links are not semantically equivalent at all, since changing one of the hard linked files would change all of them, by definition.
Just ask the file system!
While there are APIs to create clones, there's nothing there to find out whether two files are clones... and also, the shared data is at the block level, so still, no.
Time Machine does it!
Well, not really. Time Machine does seem to be able to determine if two files are clones (which I assume it's doing with private APIs, because I can't find any documented APIs to determine if two files are clones). When it backs up cloned files, it uses hard links to represent them (since HFS+ doesn't support clones, and Time Machine can only back up to HFS+ volumes), and when it restores, it checks to see if those files are clones (which it tracks in a special database), and restores them as clones to APFS...unless they're restored to an HFS+ volume, where all bets are off.
But even in the best case, restoring to APFS, when files get 'separated' when they're changed, again, only the part of the file that was changed is separate. The other blocks are still shared. So even though they've jumped through hoops to maintain the clone relationship, there are lots of cases where Time Machine's own copies will increase in size too, and it happens more and more as the files diverge further.
You guys are so smart, you figure it out! Why are you asking me?
Geez, don't get so defensive!
We're All in this Together
So, as you can see, given the low-level behavior, there's really no solution, even when you're Apple.
What does this mean for you? It means you can get in cases where data that fits on a source drive won't fit on a destination, even when the drives are exactly the same size.
To avoid problems, you need enough space to store the full logical size of the data (that is, with all the "clones" separated) when you copy, unless you're copying the entire container at a sector level.
We Good?
Again, this doesn't mean your backup isn't good! It is! It has all your data!
What it does mean is that the data isn't stored as efficiently on the backup. So, it might not fit on your drive when you back it up. And it also might not fit when you restore, if the backup ends up larger than the capacity of the source.
That's easy to check, and the solution is also pretty easy: have plenty of free space on your drives, folks. It's always been good advice, and given all this hidden behavior that happens with cloned files, it's even more important with APFS.
OK, back to the code mines...
Automatic Transmission Sunday, October 22, 2017
Good news: we've set things up on our update server so that the Beta version will now automatically tell you when there's a new beta ready, using our regular update mechanism.
Here's how it works:
- You "opt-in" to the Beta by installing one of the beta releases from the blog.
- The update server knows what versions are Beta versions. When you check for updates, and if you're running a Beta, it returns the current Beta, rather than the current production release.
- At the end of the Beta, we set the final "Beta Update" to the production release as shipped. Everyone with the Beta automatically updates to the production version, and future updates are normal, production updates.
- If you want to participate in a future Beta, you can do so by downloading and installing a Beta version, and the process repeats.
Hopefully this will make it easier for everyone to keep up with the current Beta releases.
Don't forget, though: if you're running schedules, you won't notice the updates unless you launch SuperDuper! manually... so, if you want to be sure, check for updates manually.
Thanks to all the testers—we really do appreciate your help.
Forward Into the Past! Tuesday, October 17, 2017
Executive Summary
Beta 5 is linked at the bottom of the post: we now copy Recovery volumes from both HFS+ and APFS sources to APFS, and "stash" recovery on HFS+ destinations for restoration to APFS if needed.
Details, Details!
Before the advent of APFS, volumes were rigid elements created by physically partitioning a drive, logically erecting barriers between fixed areas of storage. While in later versions of macOS those barriers could sometimes be moved by the command-line diskutil, that functionality was not exposed in the GUI Disk Utility until relatively recently, and was prone to failure.
Even then, adding, resizing and removing partitions was more convenient and accessible...but relatively fragile. Reliable, extensive partitioning (with a friendly interface) was only available in 3rd party tools like iPartition, because it was able to physically relocate data blocks, change partition schemes, etc. The inherent rigidity of the layout of HFS+, even after the introduction of the intermediate-layer CoreStorage setup, got in the way of reliable volume creation and resizing, making the process risky.
Casiotone Nation
The design of APFS changes and improves all of that. Volumes inside an APFS container aren’t defined by rigid barriers, and their storage doesn’t have to be contiguous. All of the volumes in a given APFS container are extremely flexible and share a common free storage pool managed by the container itself. Creating and deleting partitions is a simple and safe operation. There's no need to create images to try to maximize storage efficiency on a drive, or to store three backups on a given drive: you just add new partitions, and they do what you'd expect. Failure is quite rare and for typically obvious reasons.
The Past is Prologue
When Apple got rid of CDs and switched to Recovery it was, in many ways, a step back. Reliable, immediately accessible, archivable media was replaced by a hidden volume on a drive that could fail. Even though Internet Recovery, an EFI-based failsafe, provided a backstop, it took a long time (and required internet access) when things went really wrong.
Save for bootable encrypted volumes, though, the Recovery volume was a nice thing to have on a backup volume, but not a necessary one. While it wasn’t terribly challenging to copy a Recovery volume, creating the partition for it, given diskutil’s capabilities, was risky. And its contents were also undocumented, even if relatively consistent from release to release.
Given Apple could recreate the Recovery volume during a macOS reinstall (a time consuming but easy operation that put a fresh OS under existing applications and data), and the fact that it wasn't needed for startup or restore, we decided to take a more conservative, safer approach and not copy Recovery.
Not because we couldn’t. But because we didn’t think we should, given the risks involved.
#It Gets Better
The introduction of APFS allowed us to revisit that decision. Because its more flexible volume creation is low-impact, the risks inherent in adding and managing the Recovery volume itself are minimal. Recovery now has its own special, documented “Role” within the APFS container, and its contents follow the pattern established for Preboot. Even encryption is done differently: it's properly managed in Preboot, which can be created and updated by a documented system tool, provided by Apple, further ensuring proper operation and compatibility as Apple makes changes and modifies requirements.
After carefully evaluating the new support and determining there were minimal risks, we decided that we could safely copy and manage Recovery for APFS containers, whether copied from APFS or HFS+ sources. And so we do.
That means we still don't create a Recovery volume on an HFS+ volume for the reasons above...but we can copy from an HFS+ volume to an APFS volume and properly copy its recovery to APFS (since that's as safe as APFS to APFS).
If you're copying HFS+ or APFS to an HFS+ device, we still work when restoring to APFS: we automatically create a Recovery “stash” on an HFS+ volume, and can restore it to APFS when necessary.
Your Well-Earned Reward
While the details above are a bit complicated, the best part is that, as with most other aspects of SuperDuper!, there’s nothing you need to do. The details are handled for you. It just works.
In the end, that’s our goal, and our slogan: Heroic System Recovery for Mere Mortals. We hope you agree.
SuperDuper! 3.0 B5.1
Postscript
The above is the 2nd post of Beta 5 (I called it Beta 5.1 but the version is the same). The first Beta 5 had a bug in it that caused temporary folder cleanup to fail.
This got through regression because we had tested against a number of bootable volume cases without checking the startup volume on the High Sierra test system itself (as opposed to the thumdrives, etc, that we've got for the various disk cases we handle). We tend not to run that every time because the variations (Erase, Smart Update, etc) take much longer with a huge drive. Alas, the startup volume is a different case...and we missed it.
Needless to say, that case is now checked even though it's slow (vs only during "dogfood" daily-build backup runs).
Ah, public betas This kind of stuff is OK when it's all internal. Sorry about that!
Relax, Have a Homebrew! Monday, October 16, 2017
Off-topic alert!
Over the past few months, I've been enjoying brewing beer at home with a Pico Pro. No doubt purists scoff a bit at the automation involved during the mash and boil, but it's a relatively small part of the beer making process...and doing a true, temperature-controlled step mash without investing in an expensive setup (not to mention the space it would take up) is a huge win.
It's been a lot of fun.
The biggest challenges, and the place where a lot of brewers fall down, are in sanitizing and controlling fermentation: keeping things at the right temperature, consistently, so the yeast can work its magic efficiently without producing off flavors.
I can't help with sanitizing (you just have to do a better job!) but I can help with fermentation!
To that end, there's a great device called a TILT Hydrometer. The TILT drops into your fermentation vessel (which, in the case of a Pico Pro, is a small, 1.75L corny keg), and transmits both temperature and specific gravity via Bluetooth 4/BTLE. It's pretty cool, and by using TiltPi, along with a Raspberry Pi Zero-W to receive the bluetooth data and log it to a Google Sheet, it does all this automatically. You just peek at the sheet every so often to see how things are doing.
That all works great, but reviewing the data I realized I was having trouble controlling the temperature precisely using an external thermometer. Given the open source nature of TiltPi, and that fact that it was built with Node-RED, I thought, hey—I could use the temperature being transmitted by the TILT as a current measurement, and then use IFTTT and a few WeMo switches to exactly control both heating and cooling!
So, over a few hours in between doing SuperDuper! stuff, I learned Node-RED, figured out how TiltPi worked, added automatic temperature control, and found/fixed some TiltPi bugs at the same time. It works great!
I've provided the TILT people with my modifications to TiltPi, and hope they'll be integrating it into the official TiltPi release. Until then, here's how you can use it:
- Set up TiltPi according to TILT's normal instructions.
- Download and unzip this text file and open it in your favorite editor.
- Open the TiltPi Node-RED editor. This should be here: http://tiltpi.local:1880.
- Copy the contents of the text file to the clipboard.
- Using the "hamburger" menu, select Import > Clipboard. Paste the copied contents into the box, and choose to import into a "New Flow". It'll be called "Main".
- Switch to the old flow tab and delete it.
- Click Deploy.
That's all the hard stuff. Next
- Set up your IFTTT Webhooks service so you get a key.
- Copy that key to the clipboard.
- Open TiltPi's normal interface at the URL it sent you when it started up (usually http://tiltpi.local:1880/ui/#/0).
- Using TiltPi's hamburger menu (so many hamburgers!), select "Logging".
- Paste your key into the IFTTT key* field.
Then, set up your various color TILTs normally. You'll see a Target Temperature slider - that's configurable on a per-TILT basis and defaults to 70F: reasonably appropriate for ale fermentation.
The next step is to set up the heat and cool steps in IFTTT. (I assume you've already got your WeMo switches configured and WeMo is connected to your IFTTT account.)
- Create a New Applet in IFTTT.
- For the "This" clause, add a Webhooks service.
- For the event name, use TILT-COLOR-temp-low, TILT-COLOR-temp-high, or TILT-COLOR-temp-just-right. depending on what you want to do.
- For "That", add the appropriate WeMo switch action.
For example, let's say that I want to control a heater for a BLUE tilt. I'd add three Webhook applets:
If BLUE-temp-low then Blue WeMo Heater Switch on
If BLUE-temp-high then Blue WeMo Heater Switch off
If BLUE-temp-just-right then Blue WeMo Heater Switch off
If you want to both heat and cool, you'd add three more events (since you unfortunately can't add extra actions to an existing event):
If BLUE-temp-low then Blue WeMo Cooler Switch off
If BLUE-temp-high then Blue WeMo Cooler Switch on
If BLUE-temp-just-right then Blue WeMo Cooler Switch off
More events can be added for more TILTs, each with its own target temperature and WeMo switch(es).
If you don't have a cooling device, and it's warm where you put your keg, do what I do: put the keg in an insulated cooler bag (I have an old version of this bag) along with an ice pack. That way, when the heater goes off, the ice pack will act as a cooler.
I hope that helps some of you make better beer. Enjoy!
Note: this post was updated on 10/22 with a new version of the flow that works better with multiple TILTs, now that I have more than one.
